Green Bag
Community

Upcycle Tutorial – Environmental Bags

Say No to plastic! That is our new mantra, right?

When we think Green bags, what comes to mind? Those ugly, bland ones in garish colours, with some corporate log stamped all over it, offering fresh promotions to someone other than you. They might be practical, but more often, ugly. Or they get dirty and you can’t erase the marks, no matter what detergent you use.

Furthermore, I am inclined to prefer to drink my own ‘home-grown’, filtered water, rather than tap water, at my workplace, and thus, carry several drinking flasks to work, which becomes unwieldy in a regular handbag. My local, liquor store carry-bags have several interior compartments that are just perfect for holding bottles of wine, or, in my case, stainless steel drink flasks. Normally I carry 2-3 of these water flasks, which clank around noisily as I walk, and get dented or scratched in a normal tote bag.

However, carrying Liquor store carry bags into work each day, gives out the wrong message to my colleagues. “Look at her: she just can’t keep out of the Liquor store!!” I could almost hear it whispered about in the corridors of my workplace, each day. There had to be a better approach, I thought.

I have already shown you how to create a new shopping bag out of old clothes and fabric scraps here in this tutorial, but another solution to going plastic free and reducing plastic waste is to “Upcycle” the ‘green’ bags, by adding a pretty fabric cover which is machine washable. This gives me the chance to use some pretty fabric from my stash and get a stylish tote bag in the process. Here is how I did it:

Step 1

Grab some iron-on batting or interfacing, and a piece of pretty fabric (slightly larger than the bag’s measurements) or two, that is if you want to add a pocket on the outside to hold keys, phone etc etc.

Blog pics 001

Step 2

Try out a few combinations until you are happy with the contrast of fabrics and colour schemes. Keep in mind they should complement the colour of the green bag itself.

Blog pics 002

Step 3

Cut a piece of interfacing the dimensions of the bag. Now cut the fabric to fit the bag not forgetting to add a 1/4 inch hem allowance on all sides. I find it works better if I iron the hem allowance under, before I sew it. Tacking also helps keep the fabric in place. It will be impossible to sew the complete four sides of the bag, with the machine, as the bag is already assembled. So some hand sewing will be required in those places that your sewing machine foot cannot reach.

Blog pics 003

Step 4

If you are attaching a pocket, cut, trim and hem before you sew the fabric to the front and or back of the bag. Iron on the interfacing etc…. you already know how to do this….

Blog pics 005

Sewing in progress.

Tip: Use a strong/thick needle for sewing this bag. They make them tough and that will break a #80/90 gauge sewing needle.

Blog pics 006

Step 5

Repeat on the back side of the bag. As I said, use a strong/thick needle for sewing this bag. They make them tough and it will break a #80/90 gauge sewing needle.

Blog pics 007

Step 6 (optional)

The pocket looked  a bit plain, so I added a heart motif applique, for contrast.

That’s it…. all done, and I do like to take this everywhere now. Holding my lunch and water allowance for each and every work day. The bag fits in at the workplace in a way the Liquor shop carry- bag did not!!!

I hope this gives you some ideas to ponder about.

Blog pics 015

designing bags red work
Community

Kicking out Plastic – Tutorial Signature Shopping Bag

embroidery hack
Design penned onto calico shopping bag

I really hate using plastic bags and avoid them at all costs. As supermarkets here are phasing out single use plastic bags, there is even more need for consumers to have their own environmentally friendly and sustainable shopping bags.

And it is not just reusable bags for groceries. Even when buying a new outfit, I will carry a clean cotton bag for my purchases inside my regular handbag, rather than use a plastic variety that is not only bad for the planet, but also advertises companies who make absolutely no effort to take care of the future of the environment and wildlife. Why would I want to promote them?

In less than ten minutes, you can create an individual environmentally friendly solution. A solution, so easy, that even the children can get involved and create their own reusable, plastic free shopping bag.

Back in 2012, I began making a variety of D.I.Y, “plastic free” bags: in Redwork embroidery, painted Norwegian Telemark and floral designs, and also with a pen and painting technique.

Here are a few samples from my existing bag stash.

But I needed more bags to have on hand, and as plain calico is rather plain, and ‘Redwork’ embroidery makes such a pretty and easy adornment. My initial plan was to embroider some designs on the new calico bags, in redwork technique, with a needle and thread. However, I am not the world’s neatest hand sewer ( far from it, really), and embroidery takes me for-EVER to complete, as I have an aversion to sewing, itself!

Solution: Enter the Evanscraft craft and cross stitch pen…. a permanent, acid free pen in a Barn red colour, that can simulate cross stitch or other types of embroidery. Wonderful! With this technique, you can create a pretty cottage garden or folk art design on fabric, (or even wood), and the result is something unique, and useful, created in a matter of minutes.

More time for plastic free shopping!!

It just might inspire others to take up plastic free shopping as well.

flower pattern

You will need:

  • A Calico or Cotton bag in a light colour from your local haberdashery store, ironed flat.
  • A pattern such as the one above, which you can trace over in thick black pen. NB. If you aren’t feeling particularly inspired to draw your own design, you can find plenty of free ‘Redwork’ or other embroidery patterns, (there are some here on Pinterest); in colouring books or even on google image search, itself.
  • A permanent pen, preferably in barn red or a dark red colour, but any colour will do, as long as it doesn’t bleed or run when you wash the bag. I used an Evanscraft Craft and Cross Stitch pen but please patch test the pen of your choosing, on a hidden corner, to check its colour fastness and suitability.

Instructions:

  1. Tape the design on a glass window to create an impromptu light box and trace your selected pattern in thick black pen.
  2. Tape the traced design on top of a piece of cardboard and slip both inside the bag, centering horizontally. The calico is fairly thin so it is easy to see the traced design through the bag. Mounting the design on the cardboard prevents any bleeding of the penned design, through to the rear side of the bag.
  3. Then it is just a matter of re-tracing over the pattern with the chosen pen, and adding a few embellishments of your own, within and around the design.
  4. A final press of the bag, with the iron seals the design and you are ready to shop!

Tip: A ruler may be used to keep long lines straight, or you may prefer to keep them loose and rustic, as I did in the border design. Use the ruler turned upside down to prevent smudging on to the bag.

A major complaint of those who continue to use plastic bags, is that they forget to bring the re-usable bags, along with them, when they shop.

I purchased the plain cotton shopping bags from Lincraft for a dollar each. Not only are they strong, bu they can be scrunched up to a really small size, for carrying inside my handbag, (see in photo to the right above).

In this way they are always on hand, for my use just when I need them.

No more forgetting the bags!!

What design would you choose?

Something environmentally friendly and creative to ponder About.

Hallingdal Rosemaling
Community

Traditional Art – DIY Hallingdal Rosemaling

Norwegian Rosemaling is the style of traditional painting very popular in parts of America, where it is a favoured style of interior decorating, especially amongst those folk with Scandinavian heritage.

Each region, or ‘fylke’, in Norway, developed its own individual interpretation of traditional Rosemaling style and design, which initially appeared around the 18th century.

Hallingdal style on a cupboard in Geilo

History of Rosemaling

As early as the 17th century, itinerant painters brought new ideas and artistic trends from the cities of Europe into the mountains and Valleys of rural Norway, painting Renaissance and Baroque motifs on the walls of the wooden Norwegian Stave churches.

The relative geographic isolation in the Hallingdal, Telemark and Vest Agder provinces led to further development and evolution of this peasant folk art form into a highly distinctive and unique art.

Reaching its zenith in Norway during the 18th century, Rosemaling was then revived by the Norwegian peoples during a fiercely Nationalistic decorating movement in the 19th and 20th centuries, following the country’s political separation from Sweden.

A similar resurgence in Norwegian traditional painting began amongst Norwegian immigrants, living in the American Midwest, in the mid to late 20th century, and this trend continues to flourish there today.

Read more here

Hallingdal style of Rosemaling

The Halling Valley, itself, is situated in an area of southern central Norway, covering towns such as Gol, Ål and Hol and this is where one finds many examples of Hallingdal Rosemaling, appreciated and loved, even today.

Elements of Halling style can be found in the Embroidery on the Norwegian women’s national costume, (called the Bunad), in Norwegian wood carving, on hanging cupboards, and on wooden objects around the Norwegian home.

Features of this Style:

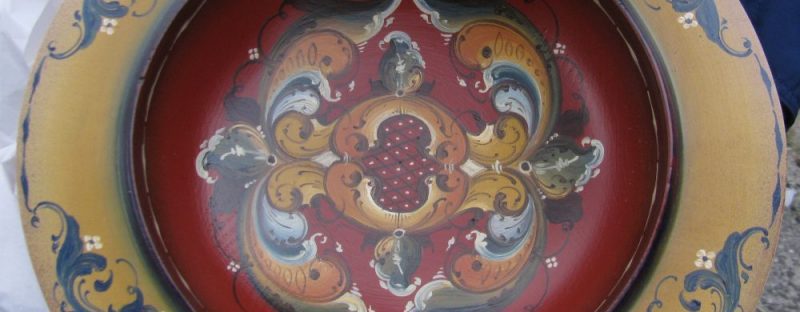
  • Hallingdal Rosemaling colours: rich, varied, exuberant and strong
  • Background colours: red/orange-red, in later years, blue and green
  • Black appeared as a background colour following influences from Telemark
  • Flowers colours: – Blue, White, or Gold on Red grounds; Red and gold on blue/ green backgrounds
  • Early Hallingdal Rosemaling had more floral elements; scrolls were minor. Over time, scrolls became a frame around which the flowers were placed, in order to achieve a sense of balance, either side of the design’s vertical axis. Scrolls still maintained a simplistic form, with little or no shading, and were heavier than the lyrical scrolls seen in the Telemark area
  • Motifs: symmetrical in round/rectangular design shapes, often depicted in mirror image split along the vertical axis
  • Round floral patterns could also be segmented into 4, 6 or 8 divisions, typically with blossoms of four or more petals
  • Leaves: large, often surrounding a central flower,  or mirror image split vertically
  • Design elements are sometimes filled in with fine, cross – hatched lines.
  • Flower shapes of Hallingdal are classified into 3 groups: circles, triangles or half circles.
Claudine Schatz

Circle Flowers

  • A circular centre is painted first and then concentric bands of colour added
  • Petals are added around the central circle in an even number, four or more, with petal length limited by the sectional diameter of the circle, and defined with liner work.
  • Ball flowers are circular flowers painted as a series of round balls surrounding a centre circle.

Triangular Flowers

  • Simple flowers with three petals, similar to a tulip; usually painted in strokes from the outside tip down to a base at the centre.
  • Blooms with more than three petals can have an oval centre, similar to a daisy.  Are  also combined into more elaborate and complex floral designs.
  • Triangular flower petal strokes can double as leaf forms.

Half circle Flowers

  • Usually are seen as larger elements within the Hallingdal design.
  • Comprise a semi-circular band of colour around a base.
  • Adorned with over strokes and details that illuminate the flower in a new way.
  • Half circles can also become petals of a flower form.

Leaves

Two types are seen in Hallingdal Designs

  • Stroke – work leaves, similar to the triangle flower petals
  • Shaded leaves, which are large and heavy and used in conjunction with large round central flowers. They do have some liner work stems.

Scrolls

  • Scrolls may represent leaves, but take the form of C and S shapes.
  • They are not shaded or blended in Hallingdal designs.
  • Used as a frame around flowers or as a cartouche border in a band that circles a round floral motif.
  • Painted in one colour; the light source is indicated by over strokes of white/ lighter colour on the top side of the scroll.
  • Scrolls are quite tight. They are not airy and lyrical, as in pieces seen in Telemark regions

Hallingdal Rosemaling even had some features borrowed from Oriental art forms. It was although typical in many ways, also malleable to outside influences. These characteristics overlap and interlace with other Rosemaling styles, and as such, should not be used as limits or boundaries, in one’s own Rosemaling journey, but merely to establish guidelines when one is starting to study this beautiful art form.

Free Hallingdal Rosemaling Designs

Why not get a feel for Hallingdal Rosemaling by painting or colouring in this design:

Free project

Something to Ponder About

[Parts of the description of features of Hallingdal style was taken from Rosemaling in the Round by Pat Virch, 1976] 
baking recipes
Community

Raspberry and Almond Shortbread

I am at a loss to remember where I found this recipe, but it was handwritten on a scrap of paper which mysteriously turned up in my cupboard last week, so rather than throw it out, I tried it out! It could well have stemmed from a binge Pinterest session or some online Scandinavian recipe site, but who knows?!

Whatever it origins, the hungry hordes in my house scoffed the finished product down with gusto. Undoubtedly, a good seal of approval.  The biscuits have a lighter texture, akin to a shortbread. In fact, one could easily substitute rice flour if one wanted to avoid wheat!

wp-image-1231837151

Ingredients

1 cup Butter ( softened )

2/3 cup Sugar

1/2 Teaspoon Almond extract ( can also use vanilla if you don’t have almond)

2 cups Flour

Pinch of Salt

1 Egg

1 tsp Milk or Kefir ( can also use yoghurt)

1/2 cup Raspberry Jam

Method

Preheat oven at 180 degree °C or 350°F

Cream butter and sugar and add the almond or vanilla extract and egg.

Mix well.

Add in salt, flour and milk/kefir and mix gently but well.

Take heaped teaspoons of cookie mix, and roll into a ball shape

Place 2 inches (5 cm) apart on a greased/lined tray.

Press your thumb into the middle of biscuit and fill the cavity with jam.

Bake the biscuits 14- 18 minutes in preheated oven. Cool 1 minute.

If you are pedantic, you can even drizzle a mix of icing sugar, mixed to a liquid with almond essence, over the top of the biscuits, if desired  – I don’t do usually this, but you might like to do so.

Enjoy!

Calorie content:  Feel free to do the math…..


Tantalizing Tuesdays

Something Edible to Ponder About


telemark rosemaling
Community

Rosemaling and Art Coloring in Designs

Rosemaling is an art form that evolved in Norway post Renaissance. It is a stylized form  that is highly parochial due to the relative isolation of the valleys in Norway. Consequently, each valley developed their own particular style adapting what the influences brought to them via itinerant artists roaming the countryside.

rogaland-rosemaling
Rogaland Rosemaling

Some of us don’t feel very artistic, but I believe we can learn to tap into that side of us. We can start by coloring in Rosemaling designs. This develops muscle memory and our brains learn the forms, shapes and lines used in this style of art. That makes it easier when we come to reproduce our own.

These designs are for your personal use in coloring in, or to paint, in practising Rosemaling design

A simple Rosemaling flower with Telemark Scroll like leave

Rogaland Rosemaling

Hallingdal Rosemaling

You can also find more images to colour on the net, like this one:

Image result for rosemaling coloring in page

This drawing is taken from the following source:-

http://www.supercoloring.com/pages/norwegian-rosemaling

Click to learn more about developing LINE and SHAPE as an element in sketching.

Something therapeutic to Ponder About

Save

Save

Save

Save

Save

Save

Save

Community

Up- cycling DIY Tutorial From Tired Placemat to Pretty Tea Cosy

What can you do with an old fabric place mat, that feels too good to throw away?

Use the extra thermal padding and pretty fabric as a Teapot Cosy!

Blog pics 035 (768x1024)

15 minute up-cycling project, that will leave you with endless cups of hot tea,( or as much as your teapot holds) and you will be helping the planet. Waste less, enjoy more!

In all seriousness,  this only took me 15 minutes to complete. And I am not on friendly terms with my sewing machine, so it may even take less time for experienced crafters!

Tutorial: Up- cycling project. Place-mat to Tea Cosy

You will need:

–   1 fabric place-mat, of a standard size, table setting.

Blog pics 025 (1024x768)

Mine was 44cm x 30cm.

–   Complementary ribbon or bias binding for edging of cut side and loop.

(Simply double the width of the placemat and add extra for tucking under at start and finish)

I needed 0.75 metre.

– Sewing machine with complementary coloured thread.

Instructions

1. Measure place-mat and mark half way  along its lengths on both sides.

2. Cut carefully in half.

IMG_3154

3. Pin a short length of ribbon to form a loop mid-way along the wrong side,  of what will be the top edge, of the tea cosy and secure with sewing.

This is useful for removing the tea- cosy to pour the tea, or hanging up to air or dry!

Blog pics 031 (1024x768)

4. Fold over the ribbon 0.5 cm at the start and pin bias binding or ribbon along cut edge.

    Sew to secure. As I used a ribbon, a zigzag stitch was best;

   But you could use a triple stitch or anything to secure the edge to stop it from fraying. Tuck in another little piece of ribbon at the end of each side.

( I didn’t really need to tell anyone that, did I?)

5.  Finally pin the place-mat, along the edges, wrong sides together.

Blog pics 030 (1024x768)

 6.  Sew along the three outer sides of the two halves of the place-mat.

IMG_3160

Now you are ready for a hot cup of tea, or two or three. And the padding on the reverse side of the mat, means your cuppa stays HOT!

I really wish I had this makeshift teapot cosy, on hand when my kids were little, as I was forever drinking cold or lukewarm cups of tea.

I hope that you can recycle some of your pretty place-mats in a similar way. Do you have any lurking in the rag box? Something to ponder about today.

Check out Natasha’s Linky party too for more craft inspiration.

Poofy Cheeks

Painting

Hand Painted Flower – DIY Dry Brush / Overlay Technique- Free Pattern

A quiblog pictures 004ck but effective way to decorate a small object is by painting a simple garland of hand-painted flowers. “Oh! But I am not a painter I hear you say!!” Well, that’s ok, because you don’t need any specific skills for this technique. It is VERY forgiving! And it does not have to be perfect.

1. First, download the image of the flower in the garland below, and print it from your computer, or if you feel particularly competent,  hand draw on tracing paper.

2. Copy the image using chalk or pencil or transfer paper,  on card, fabric, or a paper mache/wooden box that has already been prepared with 1-2 coats of a suitable acrylic background paint. I use a transfer paper in light or dark shades according to the colour of the background paint. ( light on dark backgrounds, vice versa on light backgrounds)

3. Using your chosen dark colour, (in the example: Paynes Grey/Dark Blue) stroke in the petals with shape-following/comma strokes, beginning at the outside of the flower and pulling the strokes towards the centre, using a synthetic/sable round brush in size 3 or 4, depending on how big you want the petals.

*If you know how to do ‘comma’ strokes, use them, but a fine tapered tip near the centre of the petal is not necessary. So don’t stress. If you need more help in forming the strokes: see the linked articles below.

2013-04-11 tiffany heidi pics

4. Load a round or filbert synthetic brush (hogs hair or sable brushes don’t work so well here), with Warm White, or a light contrasting colour.

NB: In this technique, you do not wet the brush, or if you do dip it in the water jar, squeeze out most of the moisture, on some kitchen paper towel.

5. Begin to gently stroke in some colour, on top of the already existing blue colour, pulling just the top half of the brush over each petal, starting at the outer edge. Lift off completely before reaching the end of the petal, so that the darker blue colour will still show towards the centre. The dark colour then acts as your shadowed area, and the white is the highlighted area of the petal. This gives your flower more of a three-dimensional look.

6. Continue adding layers of warm white in this dry brush technique until you are happy with the effect.

Caution: It is always easy to dry brush additional highlight into the petals, if there is not enough, however, removing it if you have put on too much to begin with is extremely difficult and messy. **** If this happens, just re-do your basecoat of dark blue again, and start from #4.

7. If need be, use a brighter white, in an even smaller area near the very edge of the petal, to create ever more of a highlight.  Watch the leaf that has the turn-back, as this leaf will be in more shadow than the others, and as such, still retains most of the blue shade. flowercentre

8. Paint the centre with a ‘stipple’ effect, in a c shape, leaving the centre in the dark blue colour. The highlight colours I used include: gold oxide, yellow and white on the very highest edge. The ‘stipple’ effect is sort of like dot, dot dotting, the colour in just with the very tip of the brush. You can use an older brush for this, or a round hogs hairbrush, as it is not so imperative to have a fine point.

In this example, I also used the same dry brush technique for painting the leaves: Using a pine green colour for the base, and adding progressively more yellow to the green to get a lighter colour, using this as my dry brushed highlight.

Related Articles:

how-to-paint-comma-strokes-beginner-folk-art-painting-tutorial/

Flower

Image of pencil outline adapted from V. Phelps, FADP.

Save

Save

History & Traditions, Painting

Renaissance Baroque art Faux Finish

Helen Kuster pattern

When you live at least four decades and more, you tend to accumulate a lot of ‘stuff’. Particularly if you are into craft, as I am. At some point, it becomes overwhelming and this is when you need to have a good look at your stash and perform a swift and sometimes cruel cull. But another less painful way to clean up is to complete some Un Finished Objects, hitherto referred to as UFOs. And do so with a determination akin to that of a Tasmanian devil hanging on to its prey.

I have not varished it yet, hence the few guidelines still being visible.  If you want to know how to do the faux finish background  I used in this project, you will find a tutorial on my blog here: Tutorial – Faux Finish Woodgrain

Helen Kuster pattern Storage Box

Thus, another one down, Only several hundred more to go…..

This pattern comes from the talented Helen Kuster of South Australia, who has made Renaissance-baroque folk art  her passion.

In the Baroque art form, dating from the 12th Centrury, there is symmetry, mass and space, but also swelling and lavish forms, sometimes almost too much embellishment, which contrasts with the restraints in the Renaissance time period, from the earlier centuries.

I first completed this pattern on a Linen hamper, for dirty laundry, and then on a few smaller items, and now this WPB…. wooden paper box..(tricked you?)  In reality, this one will live in the bathroom as a storage for toilet rolls.

One more touch I might make is to add a S stroke border along the base profile, just to match in with the top.

Then to varnish it. I always like to leave time to ponder about the project prior to varnishing, as there is always just a final touch or two I wish to add, after the completed project has ‘sat’ a while. It is a hellish job trying to paint after the application of a full coat of varnish!